The time had come to move my two-year old out of her crib and into a big girl bed. Of course, I didn’t want just any old bed. I wanted her to have one of those trendy house beds you see all over Pinterest and Instagram. Looking at them online, there aren’t many Canadian retailers who sell them, and they’re all over $500! Etsy was my next option, the prices are slightly better, but the shipping costs are insane. So, I decided to do it myself! Having little woodworking experience, I knew it would be a challenge. But I figured the materials cost me less than $100 and if it totally fails, we would just buy a regular twin bed, burn the lumber, and move on.

I did a bunch of research and found plans for a house bed at Remodelaholic. The instructions seemed simple enough, so I went out and bought all the materials to build the bed. Now, I won’t go through all the steps, but I will tell you where I had the most challenges, and how I solved them.
Cutting the lumber

My dad’s humble wooden jig. I think he may have built it himself.
I didn’t own a miter saw, but my dad had a wooden jig and a handheld saw. Boy, it took me forever to make those first few cuts. The only benefit to this method was the cuts were clean and precise with no splintered edges, but it was 15 minutes of manpower to saw through one board. Luckily I convinced my husband to invest in a miter saw by Ryobi, and the remaining cuts took no time at all!

I purchased a Ryobi compound miter saw with a 7 1/4” blade.
Pocket holes
I thought my local Home Depot would have pocket hole jigs to rent out…nope, I was wrong! So I had to buy a pocket hole jig too. I toyed with the idea of using a drill bit on an angle, but when I tested it out, it was way harder to do. I did find a mini jig kit on the Home Depot website for $27, which was an awesome price compared to the full size kits (they range from $60-187).
I also experimented with regular wood screws. but they didn’t cut it. Turns out pocket hole screws were made for a reason. Not only do they fit best in the pocket hole, but they also have a self tapping tip, which helps pull the boards together. Using your drill on the lowest speed and lowering the torque, gave the best results. I also found hand tighting the screws at the end with a screwdriver made the boards as tight as possible.

Took forever to get these two boards joined. Because it was 45 degree angles, I couldn’t clamp them while drilling in the screws.
Wood preparation
Once the house frame ends were put together, I filled, sanded, primed and painted the wood. This took the longest. Looking back, I could have saved some time if I had not purchased construction grade lumber. The boards were rough, with many dings and knots that needed to be filled. I also found the wood splintered a lot leaving large gouges near the cut ends. I used almost a whole tub of wood filler and spent days sanding. The alternative would have been buying maple or oak boards that have already been prepared for woodworking. But, for a first time project, I wasn’t ready to spend $20 a board.

I sanded using a combination of 80 grit and 100 grit sandpaper until the boards were as smooth as possible.
Assembly
Once the bed was all painted, I carried it upstairs to assemble in my daughters room. This was tricky to do without at least 2 people. I decided to use corner brackets to install the rails instead of pocket holes. I wasn’t sure how strong the pocket holes would have been, especially with my toddler jumping around on the bed.

I found L shaped furniture brackets at Home Depot which I used to attach the rails to the frame.
I also lowered the rails to 5″ off the ground. I didn’t want the mattress to be so high in case she rolled out of bed while sleeping (which she totally did 7 days in to sleeping in her big girl bed). I made two other small changes from the original plans at Remodelaholic. I decided to omit a decorative chimney to save time, and I also did not install the second brace across the top, because I didn’t want my husband and I hitting out heads on it at bedtime.

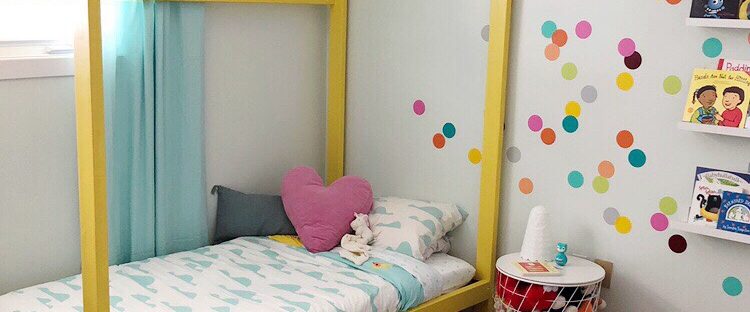
The completed bed finished with yellow melamine paint.
That’s it! I’m pretty happy with how it turned out. The perfectionist in me had to let a few things go. I will say, if you follow the plans, be very aware of your mattress size. The width ended up perfect, but the frame is about 3″ too long for our mattress, leaving quite a gap at the foot of the bed. For a toddler, I would also make the house frame much shorter. The bed ended up taller than my husband! It’s seriously massive. But, maybe in a year, I’ll take it apart, cut it down and put it back together again.

Follow Make it Laura on Instagram! Check out the highlights tab “House Bed” to see tips and video clips of the building process.