Love the look of minimalist art? Want to do it yourself? Here are three easy ways to make something beautiful for your walls.
Line Art

The completed work reminds me of ocean waves.
The simplest and most zen art project you will ever do. All you need is paper and a chisel tip marker in the colour of your choice.
Start in the center of the paper and draw a line across. You don’t have to worry about it being perfectly straight, in fact, you want to give it a little wave or slight curve. Trace another line directly under the first. The goal is to keep your lines fairly close together.

I used a small black calligraphy marker with a chisel tip.
Slightly vary the thickness of the line to give it a little visual interest. Occasionally, put a wave in a line, or have multiple lines overlap slightly. Keep going above and below your original center line until you have covered about 1/2 to 3/4 of the paper.

String Art
I’ve seen this DIY on Pinterest and wanted to give it a try myself. To get started, you need a pad of paper (I used the Mix Media paper by Canson), acrylic paint in the colour of your choice, a plastic cup, a plastic spoon or popsicle stick, and cotton string.

I mixed together blue and black acrylic paints. I wanted a blue-ink colour.
First pour some paint in the cup. You don’t need much, just enough to coat your string. Cut a piece of string approximately 2 feet long, and place it into the cup of paint, leaving a tail hanging out of the cup. Use a spoon or popsicle stick to stir the string around a bit, until it’s fully coated in paint. Pull the string out of the cup and lay it onto the open paper pad, leaving the tail end without paint hanging off the bottom edge. When laying the string, try to create some wiggles or loops, not just a straight line. Also, make sure not to use the first piece of paper in the pad, but the second or third (you’ll see why).

You can repeat the process with the same string, or another of a different colour.
Close the paper pad, sandwiching the string inside between 2 pieces of paper. Place your hand on top and press down slightly while slowly pulling the string out. Once the string is out, you can open the paper pad revealing your creation! You will have two mirror images of the pulled string. You may want to keep the best one, or hang both side by side.

Diffused watercolour
Probably the most “advanced” out of the three, but not overly complicated. You will need watercolour or mix media paper, watercolour paints, a paint brush, pencil, and eraser.

I used watercolour paint that comes in tubes, but you can also use the type that comes in a tray.
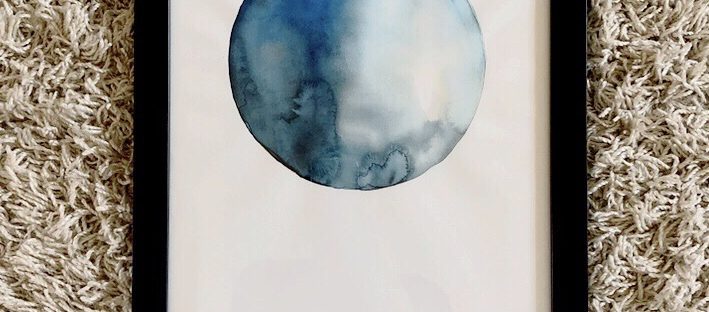
Start by lightly tracing a large circle onto the center of your paper with your pencil (I used a mixing bowl as a template). Next wet the inside of your circle with a paintbrush dipped in water. This is called a wet on wet technique. As long as the paper is wet, when a brush with paint touches the paper, it will bleed and give this awesome diffused effect.

Touching your brush down onto the paper, or sweeping it across the paper will give it a different effect. Play around on a scrap piece of paper first.
Load your brush with paint and begin painting the outer edges of the wet circle. Tilt the paper to get the paint to bleed in the direction you want. You can use one colour, or multiple colours that will bleed together and mix on the paper. Add water as you go if you find your paper is drying out. Be careful not to paint over the pencil line, or you will not be able to erase it.

I used indigo blue, black and yellow ochre watercolours.
Let your painting dry completely, then erase the pencil line. If the paper has developed a little wave, sandwich it between some heavy books for a day or two to flatten it out.

Tada! Your art is complete. Pop it into a frame, hang it on the wall and enjoy.